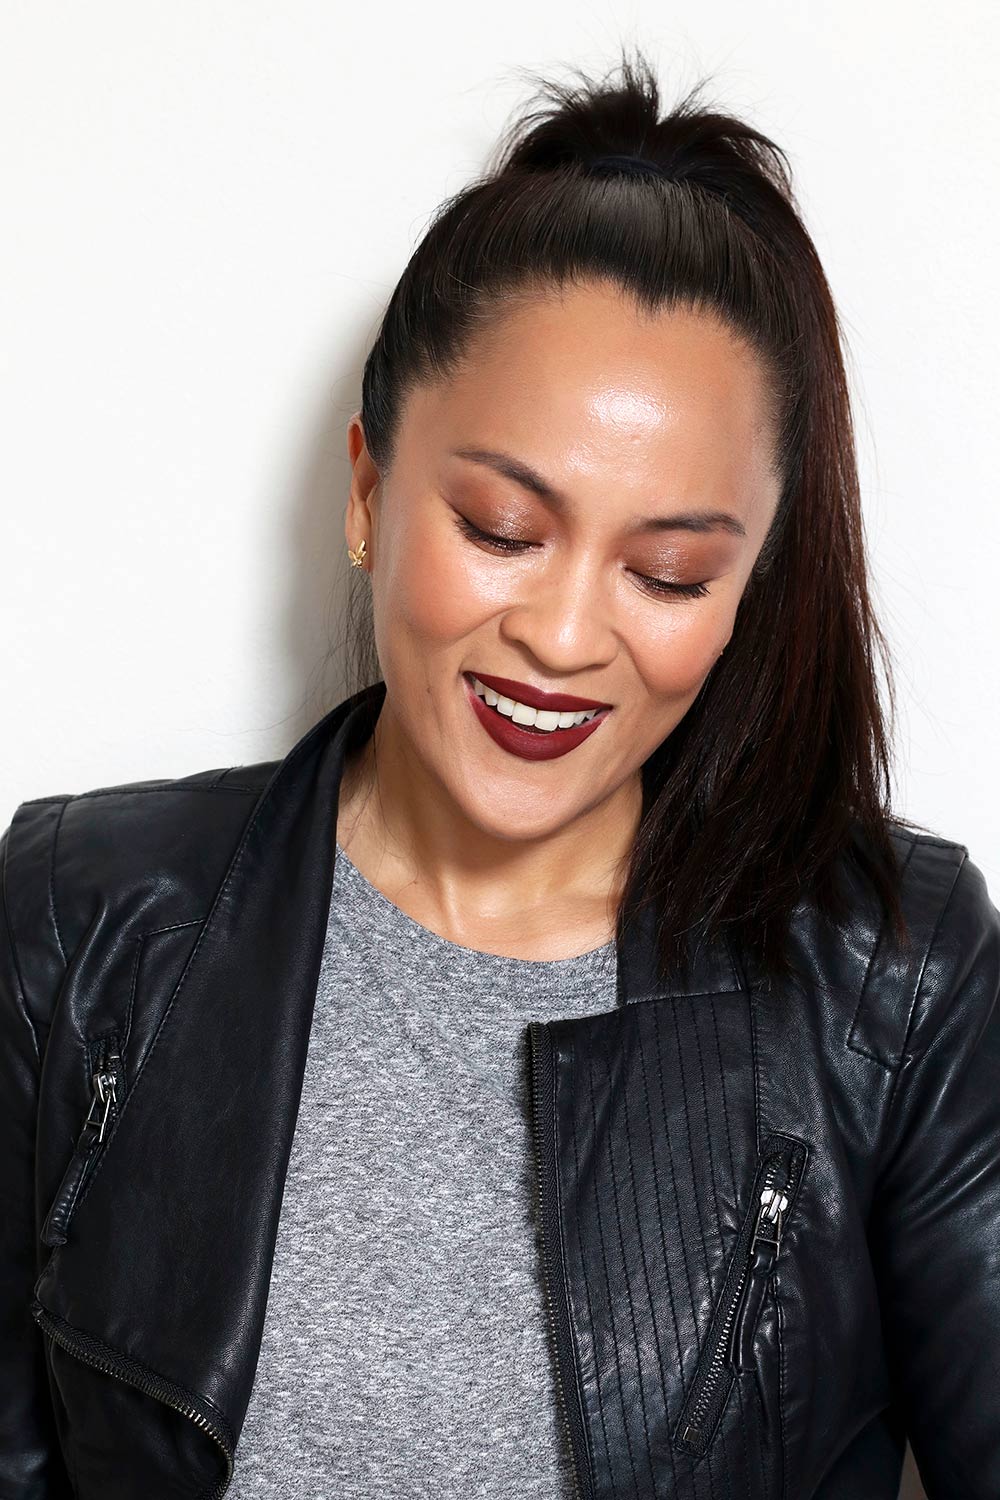
I’m cautioning you now — Possibly wear this cosmetics when you need to feel like a complete terrible @ss fit for catching, and afterward breaking, every one of the hearts in a room inside the range of 5 minutes.
This magnificence pal film matches two striking central focuses together — a chaotic ruddy brown smoky eye and a fresh darkened red matte lip — to make a jammin’ juxtaposition of messy and glitz, and you know I’m about the differentiations in cosmetics.
To keep the general look congenial and well out of Insta-glitz region, I matched the eyes and lips with modestly matte skin (there’s a similarity to a sheen), relaxed, chaotic foreheads and a warm tanned mauve cheek.
red brown smoky eye instructional exercise top pic 2
red brown smoky eye instructional exercise top pic 3
Is it true or not that you are prepared to shake?
What you’ll require
FACE Items
Face Preliminary with silvery sheen (BECCCA Backdrop illumination)
Medium inclusion fluid matte establishment (NARS Regular Longwear Radient Establishment in Stromboli and Valencia)
Concealer for your under eye region, in the event that you need (Macintosh Matchmaster Concealer in 4)
Face Powder (Macintosh Mineralize Skinfinish Regular in Brilliant Tan)
Warm pinkish mauve powder become flushed (Macintosh Additional Aspect in Artificial Sure!)
Sweet tan bronzer (Macintosh Mineralize Skinfinish Regular in Give Me Sun)
Matte darkened red lipstick (Macintosh Retro Matte Fluid Lipstick in Meat eating)
Ruddy earthy colored lip liner (Macintosh Mahogany)
EYE Cosmetics
Forehead gel, either clear or a variety that matches your temples (Hourglass Curve Temple Volumizing Gel in Warm Brown)
Two powder eyeshadows: a warm ruddy earthy colored powder eyeshadow (Macintosh Swiss Chocolate) and a glittery bronzy peach (Macintosh Honey Desire)
A warm ruddy earthy colored eyeliner, in a perfect world something smooth which you can buff out and mix (Macintosh Costa Riche)
Mascara (Advantage Awful Lady Bang!)
Apparatuses
Smear brush (Macintosh 219S)
Cushy calculated eyeshadow brush (Macintosh 275S)
Become flushed brush (Macintosh 127S)
Level eyeshadow brush (or, you can simply utilize a finger)
Something to mix your establishment (BeautyBlender)
red brown smoky eye instructional exercise items
- Face (introduction) first
Since the smoky eye is a focal point of this look, and we believe should do it competently, assuming that we start with the eyes before we finish the skin, it’ll be simpler to tidy up any aftermath without demolishing our establishment… but since the face preliminary requirements time to dry, we’ll begin with that first.
Pick a face preliminary with a silvery sheen (for surprise gleam that is scarcely noticeable underneath the fluid matte establishment you’ll layer on top), and apply everything over your face.
- Fabricate that (easygoing) forehead!
Alright, presently, fill in your temples with gel.
So we’re offering two major expressions with this look. One is the darkened red matte lip, and the smoky rosy earthy colored eyes are the other, so thick, easygoing ish temples offset pleasantly with that IMO.
- Line your upper and lower lash and water lines
Utilize your ruddy earthy colored eyeliner for this, and it’s 100 percent totally alright in the event that it’s muddled on the grounds that you’re about to smirch the hell out of it in a moment in any case. - Take a smear brush to it
Smear your lower lash line with a smirch brush, and I like to do this early while I’m doing a smoky eye in light of the fact that the edge of where that lower lash liner winds up directs how far I’ll be taking out the eye cosmetics (see stage 5).
red brown smokey eyes instructional exercise 1
- So questionable
Sketch the state of the smoky eye on your upper cover utilizing your warm rosy earthy colored eyeliner, and the specific shape you pick depends on you. Anything feels right.
I have what is happening, so I normally (yet not consistently) draw a half moon shape on my covers, and when I get to the external corner, I utilize the liner I applied on my lower lash line in the past step as my aide.
Essentially, while I’m outlining the state of the smoky eye on my upper top, I take a gander at the finish of that lower lash line, and I associate it to the side of the half moon on my upper top, subsequently wrapping the smokey impact around the whole eye for a radiance of strong variety.
Haha. I don’t have any idea why, however I just made myself giggle there. 🙂
red brown smokey eyes instructional exercise 2
- Mix the edges of the liner on your upper top
Obscure them with a mixing brush, yet attempt to keep up with the shape that you painstakingly portrayed in sync 5. You need a slope that goes from dull at the lash line and eases up as it climbs toward your forehead bone.
Any mixing brush ought to do, however I like to utilize little, semi-feathery calculated eyeshadow brushes for this.
I place the short fibers along the edge of the half moon, then delicately mix the liner utilizing cautious, controlled this way and that strokes to hold the liner back from going as far as possible up to my temples.
At the point when you’re finished mixing, clean the brush’s fibers a piece by delicately scouring the head on a paper towel.
- Utilizing a similar mixing brush
Presently load the brush with your matte rosy earthy colored powder eyeshadow, and pat it straightforwardly on top of the smirched liner on your covers. Then, at that point, mix, keeping the light-to-dim inclination.
(This escalates the smokiness.)
- The eye is getting down to business
Then, load your smear brush with the matte rosy earthy colored powder eyeshadow, and mix it on top of the liner on your lower lash line.
Note: Remember to associate the external corner of the lower lash line to the external corner of the shadow on your upper lash line to encompass the whole eye in smoky goodness.
- More modern smoke
Presently load a level eyeshadow brush (or a fingertip) with the glittery tanned peach eyeshadow, and pat it delicately on the internal portion of your covers. You can then either mix the edges with your mixing brush, or pass on the shadow to choose its own.
I do it the two different ways at times, and one way or the other works!
(In the event that you utilize the mixing brush, when you’re done with it, clean the fibers on a paper towel one final time, since you’ll require it for the following stage.)
red brown smokey eyes instructional exercise 3
- Completing the eye
At last, load your mixing brush with face powder (that is correct, face powder!), and run it along the edge of the eyeshadow on both your upper and lower lash lines. This step assists your smoky angle with looking smoother. It likewise allows you an opportunity to address any regions where you might have taken your shadow excessively high or excessively far out. - Cover your upper and lower lashes with mascara
Obviously. - Cleanup time!
Alright, we’re nearly there. Then, eliminate any aftermath under your eyes and on your cheeks, and for this eye cosmetics, coincidentally, I would spending plan 10-15 minutes, despite the fact that I have done this definite search in a short time, and it’s absolutely feasible assuming you work rapidly and perseveringly, and you acknowledge that it will be somewhat muddled.
Bunches of “ands” there, Haha.
Expect the other portion of your opportunity to be spent on the darkened red lips and your face cosmetics. Assuming you work energetically, expect 15 minutes — 5 for the lips and 5-10 until the end of your face.
On that note, we should get crackin’.
- Apply and mix your medium-inclusion fluid establishment
I speck it any place I need some additional inclusion (regularly my cheeks, temple, nose and around my mouth). Then, at that point, mix with a moist beautyblender. - Under-eye concealer
You know how it goes. - Face powder on your cheeks
I load one side of a blush brush with face powder for this.
While I’m wearing a medium-inclusion establishment, I for the most part skip face powder and depend on the establishment to do the hard work; nonetheless, with this look, I like to clean a bit of powder on my cheeks to help the blush/bronzer look smoother.
red brown smokey eyes instructional exercise 4
- Wonderful lips
Leave your face cosmetics “with no guarantees” briefly, and we should quickly move onto your lips.
Apply a dainty layer of darkened red lipstick to the focal point of your lips, then, at that point, utilize a finger to feather it out as close as you can get to the edge of your lips.
A little history on why I do lips before become flushed…
I simply feel like, when I have my lipstick on, it’s simpler to check how much blush or bronzer to apply to my cheeks, since when I do my bronzer or become flushed first, I generally end up with an excessive amount of variety all over and afterward need to invest additional energy polishing it down.
Also, it’s consistently, Consistently more straightforward to add tone than remove it.
- Line your lips
Line around the edge of your lips with the matte earthy colored pencil liner. - Idealizing the frown
Presently apply one more layer of fluid lipstick, and in the event that your edges end up a little messed up after you’re finished with this step, right them with the lip liner.
red brown smokey eyes instructional exercise 5
- Gettin’ saucy
Now is the right time to get back to the cheeks, so load a similar side of the blush brush you used to apply face powder prior with warm pinkish mauve powder become flushed, then pat that on the apples of your cheeks.
(Utilizing the side of the brush that was at that point “pre-stacked” with face powder somewhat weakens the blush, which will make it simpler to feather the edges.)
red brown smokey eyes instructional exercise 6
- Bronze meh
Flip that equivalent blush brush, and burden the opposite side of the brush head with bronzer.
Mix out the blush with the bronzer, and, in the event that you need, take the bronzer along the edge of your hairline, your jaw and down to your neck.
(I additionally prefer to tidy across my nose softly.)
- Wrapped up!
Smize for the camera! 🙂 You’re finished.